Display lists are user-defined lists of graphical instructions
which will run when particular things happen. Each page can specify
display lists to run:
before any widgets are put on
the screen,
after all the widgets have been drawn, and
after the next-page button has been pressed, but
before the new page is loaded.
The other way display lists can run is as an action tied to a
BOOLEAN widget.
This page is not a tutorial on display lists, but describes the
instructions they are built on.
Context
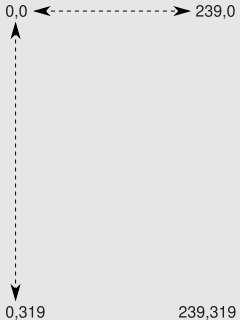
The display is organised as 320 rows of 240 pixels in each row.
X coordinates grow left to right, Y coordinates grow from top to
bottom.
Display Coordinates
Display list instructions share a graphics context which is
used and/or updated by the various instructions. It keeps track of
a handful of values:
pen position — the current x and y location. Picture a pen
poised over the the screen at this point. The MOVE
instructions move the pen position without drawing anything. Other
instructions may affect the postion as a side effect; for example the
TEXT instruction draws the letters then leaves the pen poised
to draw after the text. You could change the foreground colour and
resume with different coloured text.
foreground and background — colours to be used by upcoming
drawing instructions. FG and BG instructions set these
values.
origin — the x and y position on the display to be
considered as position (0, 0). Most of the time this will also be the
screen's (0, 0) position (top left), but can be different for
BOOLEAN widgets. The only instruction that can change the origin is
ABS.
Display list structure
The display list section can be introduced in two ways:
[DLIST] — remove all default display lists,
freeing the memory they would have used.
[+DLIST] — keep default display lists, adding
to them the definitions that follow.
Each display list entry is structured as follows:
name{ instructions }
Where:
name is a unique identifer to be used to reference this
display list from PAGE definitions or from other display lists;
The open brace must be on the same line.
instructions is a list of display list instructions
along with their arguments (see below). When the display list is run,
these instructions will be executed in sequence.
Display list instructions
Note: Only the MOVE instruction accepts negative
numbers. All other numbers must be positive.
ABS
set the coordinate origin and pen position to 0,0: the top left of the
display. ABS is useful when the display list has been
triggered by a BOOLEAN widget and the display list needs to draw
outside the widget's slot.
BG <colour>
set background to colour.
BLOFF
turn off the backlight. Can be used to hide distracting redraw
operations when changing pages.
BLON
turn on the backlight.
CALL <dlist>
run display list dlist. When that display list has completed,
the current display list resumes at the next instruction. The context
is shared: pen position, etc., will be passed to the called display
list and modified by it. CALL can be nested to a
maximum depth of 4 (A calls B calls C calls D). Should be plenty.
EAST <length>
draw a horizontal line in foreground colour length pixels to the
right of the current pen position. Pen position is set to the end of
this line.
FG <colour>
set foreground to colour.
JMP <dlist>
run display list dlist. JMP is effectively the
final instruction in the current display list because control will not
return.
MOVE <xoffs> <yoffs>
move the pen position right by xoffs and down by yoffs
pixels. If the corresponding offset is negative the pen will move
left or up.
MOVEA <x> <y>
move the pen to the absolute position (x, y). This is still
relative to the coordinate origin (see ABS).
NORTH <length>
draw a vertical line in the foreground colour length pixels upwards
from the current pen position. Pen position is set to the end of this
line.
RECTFILL <width> <height>
draw a filled rectangle in foreground colour from the current pen
position right width pixels and down height pixels.
Pen position is unchanged.
RECTFILLBG <width> <height>
draw a filled rectangle in background colour from the current pen
position right width pixels and down height pixels.
Pen position is unchanged.
RLE <name>
draw the named run length encoded image with its top left corner at
the current pen position. This operation uses both foreground and
background colours, filling the image's entire rectangle. Pen
position is unchanged.
Note: the RLE data will be copied in-line into the
display list. This can use up a lot of memory if the the same RLE is
used in several places. Say you have an RLE logo used in two
display lists, put the RLE instruction once in its own display list.
The two lists can CALL or JMP to this list after they
have set up position and colours.
RLEJ0, RLEJ1 <name>
draw the named run length encoded image with its top left corner at
the current pen position. Both operations only draw in foreground
colour. RLEJ1 draws "foreground" pixels
(i.e. those with a value of 1) and RLEJ0
only draws background pixels (with value 0). Pen position is unchanged.
Note: the same warning applies as to RLE. See above.
RLEJ0 <name>
draw the named run length encoded image with its top left corner at
the current pen position. This operation only draws the image's
background pixels (pixels with value 0) in
foreground colour, leaving the image's foregraound pixels transparent.
(the J0 refers to "jam colour zero"). Pen position is unchanged.
Note: the same warning applies as to RLE. See above.
RRECTFILL <width> <height>
draw a filled rounded rectangle in foreground colour from the current pen
position right width pixels and down height pixels.
Pen position is unchanged.
RRECTFILLBG <width> <height>
draw a filled rounded rectangle in background colour from the current pen
position right width pixels and down height pixels.
Pen position is unchanged.
SOUTH <length>
draw a vertical line in the foreground colour length pixels
downwards from the current pen position. Pen position is set to the
end of this line.
TEXT <string>
place normal text characters on the screen with the top left of the first
character at the current pen position. Pen position moves to
just after the last character in the string (in other words ready to
draw the next character). Both foreground and background pixels are
drawn in each cell. The font is fixed-width with each character cell
being 12 pixels wide by 17 pixels high.
TTEXT <string>
place tiny text characters on the screen with the top left of the first
character at the current pen position. Pen position moves to
just after the last character in the string (in other words ready to
draw the next character). Both foreground and background pixels are
drawn in each cell. The font is fixed-width with each character cell
being 7 pixels wide by 12 pixels high.
WEST <length>
draw a horizontal line in foreground colour length pixels to the
left of the current pen position. Pen position is set to the end of
this line.
Default display lists
Configuring display lists is optional. If you don't define a DLIST
section in your configuration a default defines a few simple screen
erase operations which you can use from your page definitions. Here are
the default display list definitions:
All but the last simply set a background colour and jump to
bgfill. It fills a screen sized rectangle in background
colour, then turns the display backlight on. Pretty simple. One
possible point of confusion is that names like redbg are used
for both display lists and colours. These names are kept in different
places, so when a colour is needed (e.g. the BG
instruction), the colour will be found; when a display list is needed
(e.g. the JMP instruction) the display list will be
found.
An empty [DLIST] section will remove all default display
lists. This will leave you with the display's default background:
a black and white tiny chequerboard pattern.
RLE Section
RLE stands for run length encoding, a simple compression
technique often used (as here) for 2-colour images. The dashboard
only uses these images from display lists. The reason RLEs aren't
included in the DLIST section is because image data tends to be
bulky. It is neater to define a named image in the RLE section and
refer to it by name in the DLIST section.
Each display list reference to an RLE causes the whole RLE to be
expanded in-place. This means that a lot of memory can be used up
needlessly if you refer more than once to a particular RLE.
The RLE section is optional and has no defaults. It is introduced
with the [RLE] section marker.
Each RLE entry is structured as follows:
namewidthxheight{ rle_body }
where:
name is a unique identifier for this RLE
width is the width of the image in pixels
height is the height of the image in pixels
rle_body is the run length encoded image. The format
is internal to the dashboard and may change in the future.
The pbm2rle utility converts a standard
ASCII PBM image to the dashboard RLE format.
Memory use
The number of bytes required for the RLE body is half the number of
visible characters within the braces. As pbm2rle formats it,
the size is 32 bytes per full line plus half the number of visible
characters on the last line (if it isn't full).